Bitbucket Approvals on Jira Cards/Boards
What/Why…
I wanted to show pull request approvals from BitBucket on a Jira board without having to open individual stories to see this information.
It helps identify stories needing to be progressed or regressed, for example if the PR is updated after code review it loses it approvals. This might not be obvious if the story is now being tested by end users but seeing any stories with a red cross in that column means it now stands out.
It would be just as easy to automate transitioning between columns based pull request approvals but I’m not sure I’m quite ready for that (yet).
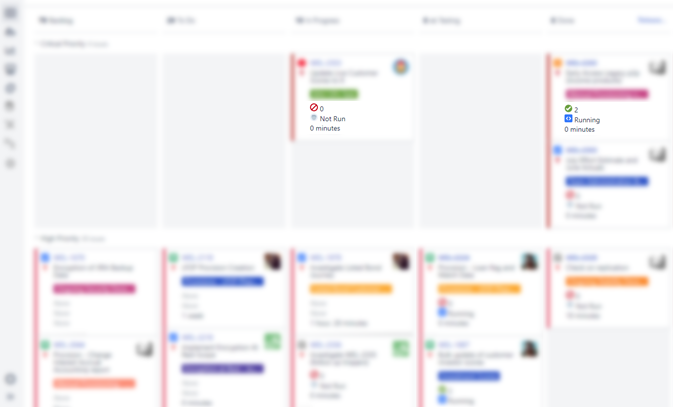 Example Above
A board where stories that have a linked pull request with 0 to 1 approvals show a red icon and stories with pull requests having 2 or more approvals show a green tick and the count.
The line below code approvals shows the results of the automated tests triggered on PR creation/update.
Plugins vs Slightly long winded solution
I couldn’t find a plugin that did what I wanted, so I used a web hook from BitBucket to the Jenkins server that starts a job to count the approvals then make a call to the Jira rest API to update a custom field with the count of approvals. It’s very helpful that there is a naming convention for branch names and that it contains the Jira issue ID.
Step 1 – Jira Custom Field
Add a custom field to Jira. The icons for Jira plugin is great for this type of field. For my project two code review approvals are required before it is considered a pass.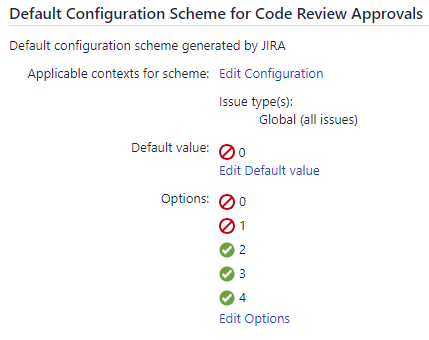
Step 2 – Bitbucket webhook
For your repository go to settings >> Webhooks >> Add webhook.
Title: Something descriptive
URL: https://yourjenkinsserver.com/generic-webhook-trigger/invoke
Active: Tick
Trigger: Choose from a full list of triggers, select Approved/Approval removed.
Step 3 – Jenkins Freestyle Job
Plugins required – Generic Webhook Trigger
Post content parameters:
Variable: Branchname
Expression: $.pullrequest.source.branch.name
(JSONPath)
Variable: approval1
Expression: $.pullrequest.participants[0].approved
(JSONPath)
Variable: approval2
Expression: $.pullrequest.participants[1].approved
(JSONPath)
Variable: approval3
Expression: $.pullrequest.participants[2].approved
(JSONPath)
Variable: approval4
Expression: $.pullrequest.participants[4].approved
(JSONPath)
Build (ok I realise this could be written soooo much nicer):
#!/bin/bash

echo "${x_event_key}"

// Get the Jira issue ID from the branch name
jiraissue=$(echo ${branchname} | cut -d'_' -f 3)
echo $jiraissue

a="${approval1}"
b="${approval2}"
c="${approval3}"
d="${approval4}"

t="true"
i=0

if("$a" == "$t")
then
	i=$((i + 1))
fi
if("$b" == "$t")
then
	i=$((i + 1))
fi
if("$c" == "$t")
then
	i=$((i + 1))
fi
if("$d" == "$t")
then
	i=$((i + 1))
fi
echo "count $i"

if [[ "$i" == "0" ]]
then
    curl -D- --user "jirausername:password"  -X PUT    --data '{"fields": {"customfield_13003" : {"id": "10409"}}}'  -H "Content-Type: application/json" https://jiraserveraddress.com/rest/api/2/issue/$jiraissue
fi
if [[ "$i" == "1" ]]
then
    curl -D- --user "jirausername:password"  -X PUT    --data '{"fields": {"customfield_13003" : {"id": "10410"}}}'  -H "Content-Type: application/json" https://jiraserveraddress.com/rest/api/2/issue/$jiraissue
fi

if [[ "$i" == "2" ]]
then
    curl -D- --user "jirausername:password"  -X PUT    --data '{"fields": {"customfield_13003" : {"id": "10411"}}}'  -H "Content-Type: application/json" https://jiraserveraddress.com/rest/api/2/issue/$jiraissue
fi
if [[ "$i" == "3" ]]
then
    curl -D- --user "jirausername:password"  -X PUT    --data '{"fields": {"customfield_13003" : {"id": "10412"}}}'  -H "Content-Type: application/json" https://jiraserveraddress.com/rest/api/2/issue/$jiraissue
fi
if [[ "$i" == "4" ]]
then
    curl -D- --user "jirausername:password"  -X PUT    --data '{"fields": {"customfield_13003" : {"id": "10413"}}}' -H "Content-Type: application/json" https://jiraserveraddress.com/rest/api/2/issue/$jiraissue
fi
You would have to replace the custom field ID, the option ID’s as well as credentials/url to Jira. The code above is just am example, credentials should be stored securely in Jenkins and the Jira user account you are using should have it’s access limited to only the functions it needs.
Possible issues
When working with the rest API and your user has a number of authentication failures you may have to login manually with the account to pass the Captcha check (more information here).